Layout dialog box


|
Layout dialog box |
|
|
To display the Layout dialog box select Edit Current Layout on the File menu.
Allows you to enter the properties for a new layout or edit the properties of an existing layout. The layout defines how the elements (cards or labels) are arranged on the page. For example, the standard business card layout is defined as follows:
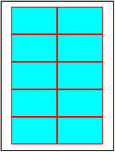
This would produce a page arranged like this:
In this case there is no gap between the rows nor between the columns. The shaded area represents the cards and the non shaded area represents the margins.
When you create a new file based on this layout you will be given a 3.5 x 2.0 inch area to design. When you print a full page, ten cards will be printed on the page, arranged as shown above.
To enter the properties for a layout perform the following steps:
Layout Name
Enter a descriptive name for the layout.
Paper Type
Select the paper type from the list.
Element Size
Enter the width and height of a single element (this is the size of a single element on the page).
Region/Stock Type
This area for display only.
Page Layout
Enter the number of rows and columns on a page.
Enter the top margin.
Enter the side margin.
Enter the spacing between each column.
Enter the spacing between each row.
Enter the Stagger Offset
Enter the Inner Circle Radius
Check the Clip to Bounding Area checkbox if you want Label Designer Plus DELUXE to clip the output when printing to the defined area.
Check the Allow Edge Bleeding checkbox if you want Label Designer Plus DELUXE to over-print any background slightly.
Units
Shows you the units that are being used.
Click OK.
|
This page is part of the user manual for Label Designer Plus DELUXE from CAM Development